 Save
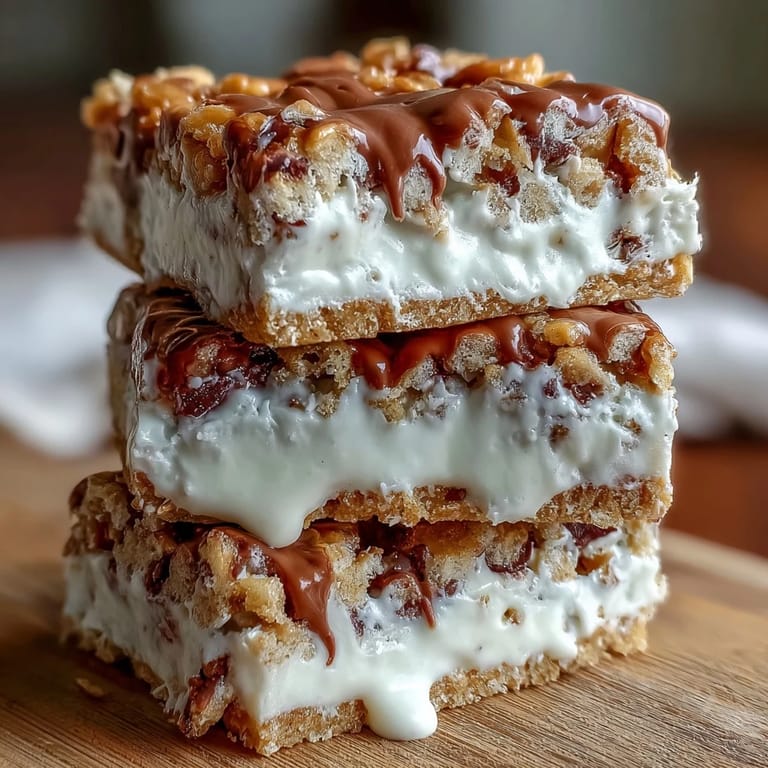
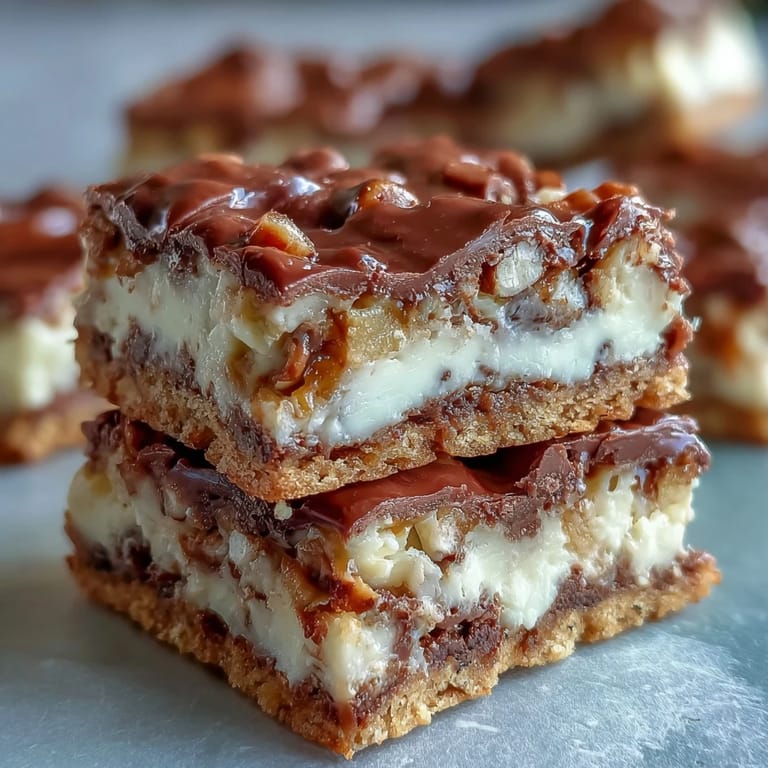
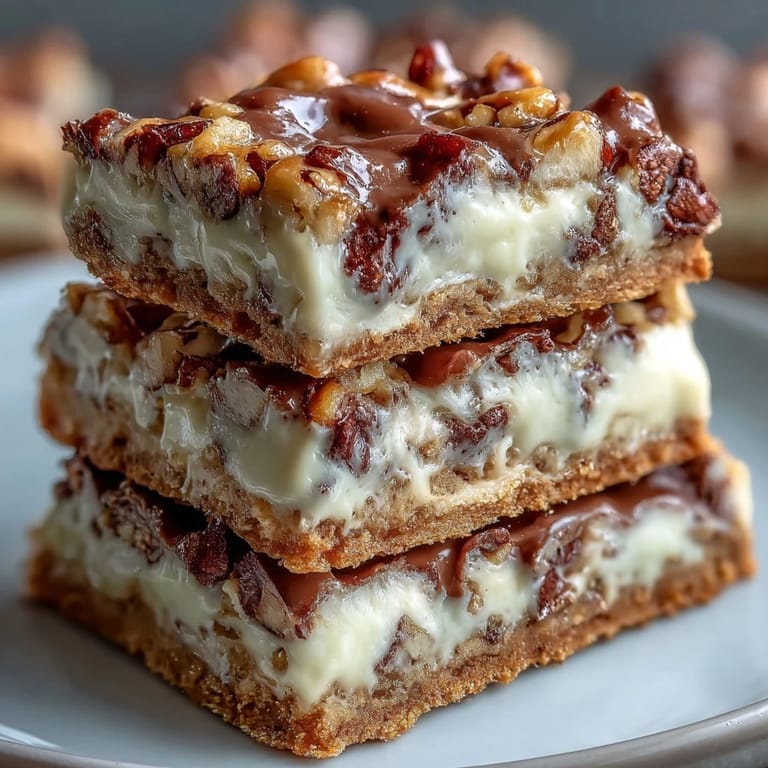
Save I discovered clotted cream wasn't just for scones when a friend from Cornwall casually mentioned stirring it into cookie dough one rainy afternoon. The idea seemed almost decadent, but watching that silky cream melt into the butter created something I'd never experienced before—a texture that was impossibly tender with this subtle, almost luxurious depth. These white chocolate studded bars became my answer to anyone asking what makes a blondie truly special. There's nothing fussy about them, just pure comfort wrapped in buttery, creamy indulgence.
I made these for a book club night where everyone was stressed about life, and somehow handing out bars that were still slightly warm seemed to shift the whole mood in the room. One person closed her eyes on the first bite and didn't speak for a solid ten seconds, which told me everything. That's when I realized these bars do something beyond taste good—they create a small moment of genuine comfort when people need it most.
Ingredients
- Unsalted butter (120 g): Room temperature butter creams better and incorporates air, giving you that light, fluffy base that makes these bars melt on the tongue.
- Clotted cream (120 g): This is your secret weapon—it adds moisture and a subtle richness that regular blondies can't touch, so don't skip it or substitute with whipped cream.
- Light brown sugar (150 g): The molasses content adds depth and keeps the bars incredibly tender, while a bit of granulated sugar provides structure.
- Granulated sugar (50 g): This balances the brown sugar and helps achieve the perfect crumb.
- Large egg (1): Room temperature eggs bind everything together more smoothly than cold ones straight from the fridge.
- Pure vanilla extract (2 tsp): The pure stuff matters here because it adds warmth without bitterness.
- Fine sea salt (1/2 tsp): A small pinch enhances all the flavors and keeps things from tasting one-dimensional.
- All-purpose flour (250 g): Measure by weight if you can, as scooping can pack flour and make bars dense.
- Baking powder (1/2 tsp): Just enough to give a subtle lift without making them cakey.
- White chocolate chips (150 g): Use quality white chocolate because you'll actually taste it, and chop chunks if the chips seem too small.
Tired of Takeout? 🥡
Get 10 meals you can make faster than delivery arrives. Seriously.
One email. No spam. Unsubscribe anytime.
Instructions
- Prepare Your Pan:
- Preheat your oven to 175°C (350°F) and line a 22x22 cm square pan with parchment paper, letting the edges overhang slightly so you can lift the whole thing out later. This small step saves you from trying to wrestle warm bars out with a spatula.
- Cream the Base:
- Beat the softened butter and clotted cream together until they're almost cloud-like, about 2 to 3 minutes—you're looking for visible lightness and the mixture to pale slightly. Add both sugars and continue beating until the whole mixture is fluffy and airy, which might take another minute or two.
- Bring It Together:
- Add your egg, vanilla, and salt, mixing until everything is completely combined and smooth. Don't rush this step because an emulsified mixture will give you a more tender crumb.
- Fold in the Dry Ingredients:
- Sift the flour and baking powder together, then add them gradually while mixing on low speed, stopping as soon as you don't see streaks of flour anymore. Overmixing develops gluten and makes bars tough, so resist the urge to beat it further.
- Add the White Chocolate:
- Gently fold in the white chocolate chunks with a spatula, being as gentle as you would when folding whipped cream into mousse. This keeps the dough tender and distributes the chocolate evenly without crushing it.
- Spread and Smooth:
- Pour the dough into your prepared pan and use an offset spatula or the back of a spoon to spread it evenly, creating a smooth surface that will bake uniformly. Don't press down hard—just guide it into the corners.
- Bake Until Golden:
- Bake for 23 to 26 minutes, checking around the 23-minute mark—you're looking for golden edges while the center still jiggles slightly when you gently shake the pan. A toothpick poked in the center should come out with a few moist crumbs clinging to it, not a wet batter.
- Cool Completely:
- Leave the pan on the counter until it's completely cool before attempting to cut, which usually takes about an hour. Cutting into warm bars will make them crumble, but cool bars slice clean and neat.
 Save
Save My neighbor once asked me what made these different from the cookie bars she makes at home, and when I told her about the clotted cream, she laughed and said it sounded pretentious. Then she took a bite and got very quiet, and somehow that quiet moment felt like the biggest compliment. That's the magic of these bars—they taste intentional and special but ask for nothing fancy in technique.
The Science of Clotted Cream in Baking
Clotted cream isn't just a dairy product, it's a texture enhancer that does something butter alone can't quite manage. The high butterfat content combined with the whey creates an emulsion that traps moisture in the dough, which means your bars stay tender even days later instead of drying out. I've baked the same recipe with just butter, and while it's perfectly fine, there's a slight graininess to the crumb that completely disappears when clotted cream is part of the mix.
Why White Chocolate Works Here
White chocolate gets a lot of criticism for not being "real" chocolate, but in these bars it serves a purpose that dark or milk chocolate can't quite fill. It adds sweetness without bitterness, it melts into pockets of creaminess throughout the bar, and honestly, it lets the subtle flavor of the clotted cream shine instead of fighting for attention. The buttery notes in quality white chocolate echo the buttery-ness of the base, creating something cohesive rather than clashing.
Storage and Serving Ideas
These bars actually taste better the day after you make them because the flavors deepen and the texture sets into something almost fudgy. Keep them in an airtight container at room temperature, and they'll stay excellent for up to four days without any fuss or special storage tricks.
- Dust with a tiny bit of powdered sugar right before serving for a touch of elegance.
- Pair them with strong tea or coffee to balance the richness and white chocolate sweetness.
- Serve alongside fresh berries like raspberries or strawberries to cut through the indulgence.
 Save
Save These bars remind me that the best recipes come from unexpected combinations and the willingness to try something a little different. They're the kind of thing you make for people you care about, whether that's yourself on a quiet Tuesday or a room full of stressed friends who need a small moment of joy.
Recipe Guide
- → What makes clotted cream bars different?
Clotted cream adds a rich, silky texture and buttery flavor that makes these bars uniquely tender and indulgent.
- → Can I substitute the white chocolate?
Yes, milk or dark chocolate can be used to vary flavor and sweetness while maintaining a similar texture.
- → How do I know when the bars are done baking?
Look for golden edges and a toothpick inserted in the center coming out with a few moist crumbs for perfect doneness.
- → What is the best way to store these bars?
Store in an airtight container at room temperature for up to four days to preserve freshness and texture.
- → Can these bars be served warm or cold?
They are best cooled completely for firm slicing, but can also be enjoyed slightly warm when the chocolate is soft.